TABLES
INSERTING
- Table
- Insert
- Table ....
- In the dialogue box enter values which define your table. Eg:
- Number of rows and columns
- Boarder thickness. If you choose zero, your table will be invisible. A handy way of keeping page elements in place.
- Alignment options position your table on the page (or inside another table ie: a table within a table)
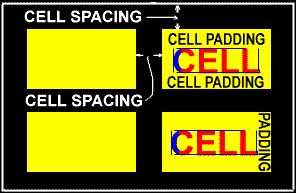
- Cell spacing and cell padding
- To insert a table within a table:
- Click inside a cell
- Repeat steps 1 to 4.
- Use the table drop down menu to:
- Insert: Rows, columns or cells
- Select a cell
- Merge cells
- Split cells
- Distribute rows or columns evenly.
FORMATTING
Exercise - Cells to appear like rectangular buttons:
- Insert a 3 cell table using the table icon (blue top row, 12 white cell with grey boarders) in the task bar. (different method that described above.) Just click on the third cell along.
- Move cursor just to left side of cell row till the cursor changes to an arrow.
- Click to highlight the 3 cells.
- Right click in any cell.
- Select CELL PROPERTIES ...
- Style
- Format
- Border
- Box
- Outset
- Border colour green
- Shading tab
- Background colour blue
- Foreground colour light blue for light blue text.
- Type Home in cell 1
- Type Email in cell 2
www.mapgoogle.org